Review : NARS Audacious Lipstick (Natalie, Michiyo & Audrey)

To be honest, I'm not one of those people who always terkinja-kinja excited when there is new makeup products launched. I usually wait for couple of months after the release, read a lot of reviews in the meantime before setting my mind to OK-I'm-doing-it-let's-go-crazy-and-buy-it-all mode.

But this one, this NARS Audacious Lipstick line feels different. The vibe, the aura, the explosive raves and commotions. 

Scrolling down IG : NARS Audacious Lipstick up and down 

Opening FB : NARS Audacious Lipstick here and there

Watching Youtube : NARS Audacious Lipstick next on play

OMG what is this thing?? So naturally, I just had to toss away everything in front of me and sprint to NARS Pavillion right away. And when I started to swatch the lipstick, it took only a single swipe when I had to literally ask the girl next to me to hold my dropping jaw.

SUPA.DUPA.CREAMY.AND.PIGMENTED.


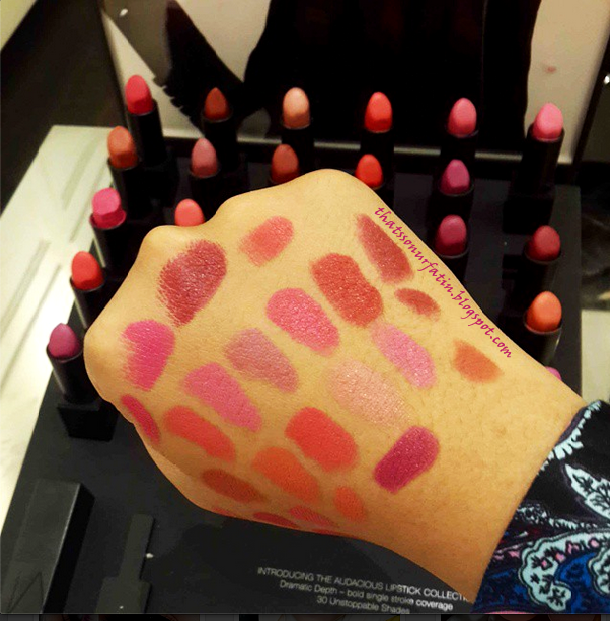
Girl, I can't even describe this. Seeing is believing. The name Audacious fits perfectly.
There are 40 amazing shades for this lipstick line and there are all permanent so take your time to collect them all. Macam Tora datang lagi pulak dah. The lipstick retails for RM95 and trust me, it's worth it. Trust me yauwl *sisterhood hugs*

I brought home 3 colors : Natalie, Michiyo & Audrey.


The lipsticks are packaged in super slick black tube with magnetic closure cap. Uuuuu fancy. No energy wasted in pushing the cap to close the lipstick. Place the cap on the very top and whoooshhh it goes sliding down and tightly closed. I'm amazed at how lazy I sound right now. Haha.


(L-R) : Natalie, Michiyo & Audrey.

Natalie ~ ♥
Natalie is straight forwardly described as flamingo color.  It is a bright coral pink color with warm undertones and it has satin texture that is not flat matte and is not overly glossy. It is creamy and pigmented but I love applying 2 layers to get a full pigmentation lip color.


One swipe (left) and heavily swatched (right)


Michiyo ~ ♥
Michiyo is described as shocking pink color. It is a bright fuschia with with cool purple-y undertones. One swipe gives an utmost pigmentation and it has semi-matte with some sheen formulation .


One swipe (left) and heavily swatched (right)


Audrey ~ ♥
Audrey is described as red currant color. It is a deep brownish red with plum hint to it. It has satin texture and glides on oooohhhh so smooth on the lips. Normally I don't go for this vampy type of color but this one just blew me away. It is opaque, creamy and beauuuuutiful.


One swipe (left) and heavily swatched (right)


PROS:
- Fancy and sleek packaging
- Rich color pay off, super duper pigmented and creamy
- Not drying and not overly glossy
- Wide array of colors ranging from nudes, corals, pinks and reds
- Long wearing
- Doesn't bled and dry out your lips
- Feels lightweight and comfortable on the lips

CONS:
- A bit expensive

MY FINAL VERDICT:
I would definitely buy some more of the colors. If you want to splurge your money on high quality lipstick, this is the one. Just go and try swatch it, you will feel like you finally find your calling. I really wanted to try out some nudes but most of it has already sold out. Talk about some hard core makeup junkie, huh? Head to NARS Pavillion now people and thank me later *cheesy wink*

Till my next review,
Atin

Follow me on IG with no paksaan dalam Islam:


Tutorial #10 : Cool Satin Taupe Makeup Look


Tadaaaaaa~

I've always wanted to try some cool toned taupe makeup look ever since I bought Maybelline Color Tattoo in Tough as Taupe. Wanna break free from pairing smokey black with typical white/cream eyeshadow ya feel me?

Products used:

Eyeshadows in the pan are from Makeup Geek. Ting!

Step #1:
After priming my eyelids with MAC Paint Pot in Soft Ochre, I mixed Frappe and Latte and swipe thse colors on my crease, blending upwards. 

Wow, where is my manner?  Ehem. Excuse my dark circle there. I haven't put on foundation and concealer yet.

Step #2:
Then take Mocha and blend it on the crease as well but don't blend it to much upwards. Blend it in secukup rasa with eyeshadows from Step #1.


Step #3:
Next, I applied Corrupt, the blackest black eyeshadow on my outer V and blend it into the crease and slightly up to the inner corner.

This is why I love doing my eyes first. You don't have to worry about being neat cause you can clean it up before applying foundation. Eyeshadow ersepah berlemoih jatuh meleleh sampai telinga pun tidak mengapa.

Step #4:
Apply Maybelline Color Tatto in Tough as Taupe all over the lid and set it with Revlon Satin Taupe eyeshdow.


Step #5:
I'm combining all steps in this last step. Apply Mocha on the lower lashline and smoke it out with Frappe. Highlight the brow bone and inner conner with Shima Shima. Last but not least, eyeliner, mascara, falsies and bammmm you're done baby!


Pair the eye look with some nude or you're feeling bold, apply red vampy lipstick and off you go flying to find some necks to bite. Haha.


♥ Eyes ♥
MAC Paint Pot in Soft Ochre | Makeup Geek e/s in Frappe, Latte, Mocha, Corrupt and Shima Shima | Maybelline Color Tattoo in Tough as Taupe | Revlon singe e/s in Satin Taupe | Urban Decay Gel Liner in Perversion | Givenchy Phenomen' Eyes Mascara | Elise Lashes in #6448


♥ Face ♥
Laura Mercier Silk Creme foundation in Sand Beige | MAC Pro Longwear Concealer in NW25 | Rimmel Stay Matte Translucent Powder | Benefit Hoola Bronzer | Makeup Geek blush in Romance | the Balm Mary Lou Manizer highlight

♥ Lips ♥
MAC Viva Glam II | Buxom lipgloss in Dolly


Review : NARS Sheer Matte Foundation


Hey you guys. 

Before we start I just want to quickly mention that any review that I do is strictly my very own opinion and how it goes on and reacts on my skin, which may not necessarily does the same to yours. It's just how it works on my oily skin.

So here's the story. In my heart, deep down, I've always envied people who have tried on the ever so popular NARS Sheer Glow foundation but I just don't have the audacity to jump on the bandwagon because; 

A. It's sheer. Sheer and I don't click that well since I have a lot of redness and acne scarring. I need full. FULL.

B. Glowy and dewy finish that it gives. Yeah, I'm oily. Like an oily greasy monster who takes bath in cooking oil. No need to add more gross-ness to that.

Anyways, when I went to NARS, the beauty adviser (BA) there suggested that I try the Sheer Matte foundation. This retails for RM165 and it has no pump so I had to pay another RM20 for the pump alone. Now I'm not gonna whine and be like "damnnnn why do they have to charge extra, give it for free already". Instead I would have prefer if they said "Hye miss, this foundation retails for RM185 and guess what it comes with a pump yeayyyyy" *blows party horn*

That would have hurt less I guess.


There. I'm pumped. Pun intended.

The BA there had me convinced that the foundation has full coverage, long lasting and provides matte finish.

HAHAHAHA what a joke.

First of all, the color is way too light for me. I told the BA that this won't work for my skin tone and that I prefer the next shade. But she told me not to pick the same color as my skin tone since this foundation will oxidize. Hey, what do I know bout this foundation? If the lady says so, then I shall believe her. So off I went with the color Fiji.

Did the foundation oxidize?

HAHAHAHA NOOOOO!

Here. See for yourself.

My problematic skin, full loads of acne scarring and redness. Excuse my white cast Amazon Tribal eyes there. I had prepped my eyes beforehand with Mac Paint Pot in Soft Ochre.

Applying 1 layer of Sheer Matte foundation on right side of my face:


I look like Deathstroke, the villain in Arrow, aren't I? 


Now let's get crazy with another layer shall we?


I don't know about you but I can't even stand looking at this. It doesn't look matte at all. And I really hate the texture of this foundation. It's thick and it sets almost immediately so you're gonna blend it super fast. And what I hate the most is that I feel like the texture is unfriendly with my skin, as absurd as it sounds.


I would say this foundation has medium buildable coverage. However, even it is pretty thick, building up the coverage does not cover my acne scars completely. It even clings to my dry scar patches.


Looks pretty okay right? 

Tetttt! Wrong!

Let me zoom in for you a little bit. Ready, go!


And here is how it looked after only 2 hours:


It's gonna be a shineee shineeee shineee shine shiny day.

It was horribleeeee OMG I can't even...So much for being a matte foundation. My face turned oily after only 2 freaking hours and the foundation was basically repelling from my skin. Cakey, flakey, blotchy, you name it I got it. I think the picture speaks for itself. Mind you, I even wore a very good oil-free primer underneath. 

Oh and the smell. OMG don't even let me start about the smell. It smells like expired canned food. And it lingers.


Mommy's not happy T_____T

 I couldn't really be listing pros and cons here. I don't even know what I'm going to do with the rest of the foundation. Usually when I buy something that doesn't work really well on me, I will find a way to make it work and finish it up. Maybe mixing it in with other products.

But this one. This devil of a foundation. Sighs. I totally regret purchasing it. Maybe it works for others. Maybe it will work on you. But it's a hot mess on me. Just so you know, if you heard everyone raves about it, remember my echoing voice, "It looks horrible on ATIN ATIN ATIn ATin Atin atin atin...."

Till my next review,
Atin


Follow me on IG with no paksaan dalam Islam:
@nurfatinzakki